

Navigation Menu
Search code, repositories, users, issues, pull requests...
Provide feedback
We read every piece of feedback, and take your input very seriously.
Saved searches
Use saved searches to filter your results more quickly
To see all available qualifiers, see our documentation.
Boost security in your dev lifecycle via SAST, SCA, Secrets & IaC scanning
License
Uh oh!
There was an error while loading. Please reload this page.
There was an error while loading. Please reload this page.
cycodehq/cycode-cli
Folders and files
Latest commit
History
Repository files navigation
Cycode CLI User Guide
The Cycode Command Line Interface (CLI) is an application you can install locally to scan your repositories for secrets, infrastructure as code misconfigurations, software composition analysis vulnerabilities, and static application security testing issues.
This guide walks you through both installation and usage.
Table of Contents
Prerequisites
cycode auth
Installation
The following installation steps are applicable to both Windows and UNIX / Linux operating systems.
Note
The following steps assume the use of python3 and pip3 for Python-related commands; however, some systems may instead use the python and pip commands, depending on your Python environment’s configuration.
python3
pip3
python
pip
Install Cycode CLI
To install the Cycode CLI application on your local machine, perform the following steps:
Open your command line or terminal application.
Execute one of the following commands:
To install from PyPI:
To install from Homebrew:
To install from GitHub Releases navigate and download executable for your operating system and architecture, then run the following command:
Finally authenticate the CLI. There are three methods to set the Cycode client ID and client secret:
Using the Auth Command
Note
This is the recommended method for setting up your local machine to authenticate with Cycode CLI.
Type the following command into your terminal/command line window:
cycode auth
cycode auth
A browser window will appear, asking you to log into Cycode (as seen below):

Enter your login credentials on this page and log in.
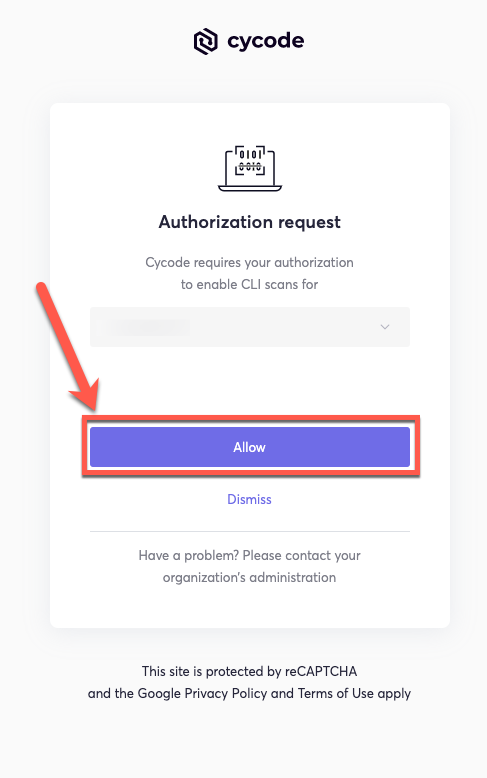
You will eventually be taken to the page below, where you'll be asked to choose the business group you want to authorize Cycode with (if applicable):
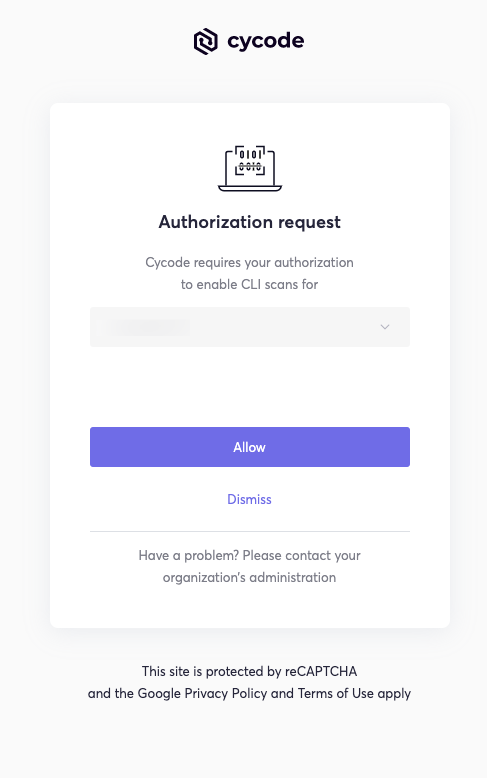
[!NOTE] This will be the default method for authenticating with the Cycode CLI.
Click the Allow button to authorize the Cycode CLI on the selected business group.
Once completed, you'll see the following screen if it was selected successfully:
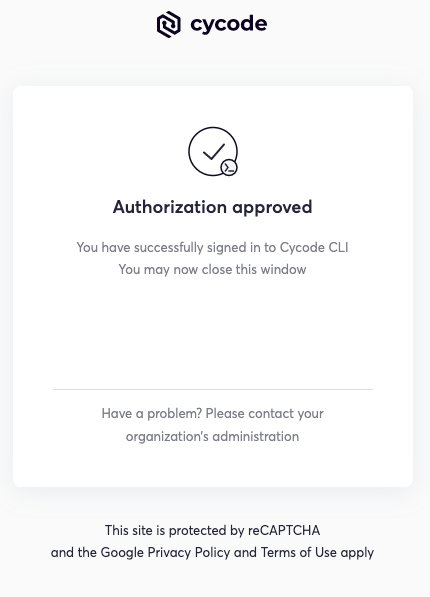
In the terminal/command line screen, you will see the following when exiting the browser window:
Successfully logged into cycode
Successfully logged into cycode
Using the Configure Command
Note
If you already set up your Cycode Client ID and Client Secret through the Linux or Windows environment variables, those credentials will take precedent over this method.
Type the following command into your terminal/command line window:
Enter your Cycode API URL value (you can leave blank to use default value).
Cycode API URL [https://api.cycode.com]: https://api.onpremise.com
Cycode API URL [https://api.cycode.com]: https://api.onpremise.com
Enter your Cycode APP URL value (you can leave blank to use default value).
Cycode APP URL [https://app.cycode.com]: https://app.onpremise.com
Cycode APP URL [https://app.cycode.com]: https://app.onpremise.com
Enter your Cycode Client ID value.
Cycode Client ID []: 7fe5346b-xxxx-xxxx-xxxx-55157625c72d
Cycode Client ID []: 7fe5346b-xxxx-xxxx-xxxx-55157625c72d
Enter your Cycode Client Secret value.
Cycode Client Secret []: c1e24929-xxxx-xxxx-xxxx-8b08c1839a2e
Cycode Client Secret []: c1e24929-xxxx-xxxx-xxxx-8b08c1839a2e
If the values were entered successfully, you'll see the following message:
Successfully configured CLI credentials!
Successfully configured CLI credentials!
or/and
Successfully configured Cycode URLs!
Successfully configured Cycode URLs!
If you go into the .cycode folder under your user folder, you'll find these credentials were created and placed in the credentials.yaml file in that folder.
The URLs were placed in the config.yaml file in that folder.
.cycode
credentials.yaml
config.yaml
Add to Environment Variables
On Unix/Linux:
and
On Windows
From the Control Panel, navigate to the System menu:

Next, click Advanced system settings:

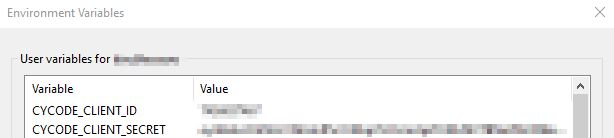
In the System Properties window that opens, click the Environment Variables button:
Create CYCODE_CLIENT_ID and CYCODE_CLIENT_SECRET variables with values matching your ID and Secret Key, respectively:
CYCODE_CLIENT_ID
CYCODE_CLIENT_SECRET
Insert the cycode.exe into the path to complete the installation.
cycode.exe
Install Pre-Commit Hook
Cycode’s pre-commit hook can be set up within your local repository so that the Cycode CLI application will identify any issues with your code automatically before you commit it to your codebase.
Note
pre-commit hook is not available for IaC scans.
Perform the following steps to install the pre-commit hook:
Install the pre-commit framework (Python 3.9 or higher must be installed):
Navigate to the top directory of the local Git repository you wish to configure.
Create a new YAML file named .pre-commit-config.yaml (include the beginning .) in the repository’s top directory that contains the following:
.pre-commit-config.yaml
.
Modify the created file for your specific needs. Use hook ID cycode to enable scan for Secrets. Use hook ID cycode-sca to enable SCA scan. Use hook ID cycode-sast to enable SAST scan. If you want to enable all scanning types, use this configuration:
cycode
cycode-sca
cycode-sast
Install Cycode’s hook:
A successful hook installation will result in the message: Pre-commit installed at .git/hooks/pre-commit.
Pre-commit installed at .git/hooks/pre-commit
Keep the pre-commit hook up to date:
It will automatically bump rev in .pre-commit-config.yaml to the latest available version of Cycode CLI.
rev
.pre-commit-config.yaml
Note
Trigger happens on git commit command.
Hook triggers only on the files that are staged for commit.
git commit
Cycode CLI Commands
The following are the options and commands available with the Cycode CLI application:
| Option | Description |
|---|---|
-v, --verbose |
Show detailed logs. |
--no-progress-meter |
Do not show the progress meter. |
--no-update-notifier |
Do not check CLI for updates. |
-o, `--output [rich |
text |
--client-id TEXT |
Specify a Cycode client ID for this specific scan execution. |
--client-secret TEXT |
Specify a Cycode client secret for this specific scan execution. |
--install-completion |
Install completion for the current shell.. |
| `--show-completion [bash | zsh |
-h, --help |
Show options for given command. |
-v
--verbose
--no-progress-meter
--no-update-notifier
-o
--output [rich|text|json|table]
rich
--client-id TEXT
--client-secret TEXT
--install-completion
--show-completion [bash|zsh|fish|powershell|pwsh]
-h
--help
| Command | Description |
|---|---|
| auth | Authenticate your machine to associate the CLI with your Cycode account. |
| configure | Initial command to configure your CLI client authentication. |
| ignore | Ignore a specific value, path or rule ID. |
| mcp | Start the Model Context Protocol (MCP) server to enable AI integration with Cycode scanning capabilities. |
| scan | Scan the content for Secrets/IaC/SCA/SAST violations. You`ll need to specify which scan type to perform: commit-history/path/repository/etc. |
| report | Generate report. You will need to specify which report type to perform as SBOM. |
| status | Show the CLI status and exit. |
MCP Command [EXPERIMENT]
Warning
The MCP command is available only for Python 3.10 and above. If you're using an earlier Python version, this command will not be available.
The Model Context Protocol (MCP) command allows you to start an MCP server that exposes Cycode's scanning capabilities to AI systems and applications. This enables AI models to interact with Cycode CLI tools via a standardized protocol.
Tip
For the best experience, install Cycode CLI globally on your system using pip install cycode or brew install cycode, then authenticate once with cycode auth. After global installation and authentication, you won't need to configure CYCODE_CLIENT_ID and CYCODE_CLIENT_SECRET environment variables in your MCP configuration files.
pip install cycode
brew install cycode
cycode auth
CYCODE_CLIENT_ID
CYCODE_CLIENT_SECRET
Starting the MCP Server
To start the MCP server, use the following command:
By default, this starts the server using the stdio transport, which is suitable for local integrations and AI applications that can spawn subprocesses.
stdio
Available Options
| Option | Description |
|---|---|
-t, --transport |
Transport type for the MCP server: stdio, sse, or streamable-http (default: stdio) |
-H, --host |
Host address to bind the server (used only for non stdio transport) (default: 127.0.0.1) |
-p, --port |
Port number to bind the server (used only for non stdio transport) (default: 8000) |
--help |
Show help message and available options |
-t, --transport
stdio
sse
streamable-http
stdio
-H, --host
127.0.0.1
-p, --port
8000
--help
MCP Tools
The MCP server provides the following tools that AI systems can use:
| Tool Name | Description |
|---|---|
cycode_secret_scan |
Scan files for hardcoded secrets |
cycode_sca_scan |
Scan files for Software Composition Analysis (SCA) - vulnerabilities and license issues |
cycode_iac_scan |
Scan files for Infrastructure as Code (IaC) misconfigurations |
cycode_sast_scan |
Scan files for Static Application Security Testing (SAST) - code quality and security flaws |
cycode_status |
Get Cycode CLI version, authentication status, and configuration information |
cycode_secret_scan
cycode_sca_scan
cycode_iac_scan
cycode_sast_scan
cycode_status
Usage Examples
Basic Command Examples
Start the MCP server with default settings (stdio transport):
Start the MCP server with explicit stdio transport:
Start the MCP server with Server-Sent Events (SSE) transport:
Start the MCP server with streamable HTTP transport on custom host and port:
Learn more about MCP Transport types in the MCP Protocol Specification – Transports.
Configuration Examples
Using MCP with Cursor/VS Code/Claude Desktop/etc (mcp.json)
Note
For EU Cycode environments, make sure to set the appropriate CYCODE_API_URL and CYCODE_APP_URL values in the environment variables (e.g., https://api.eu.cycode.com and https://app.eu.cycode.com).
CYCODE_API_URL
CYCODE_APP_URL
https://api.eu.cycode.com
https://app.eu.cycode.com
Follow this guide to configure the MCP server in your VS Code/GitHub Copilot. Keep in mind that in settings.json, there is an mcp object containing a nested servers sub-object, rather than a standalone mcpServers object.
settings.json
mcp
servers
mcpServers
For stdio transport (direct execution):
For stdio transport with pipx installation:
pipx
For stdio transport with uvx installation:
uvx
For SSE transport (Server-Sent Events):
For SSE transport on custom port:
For streamable HTTP transport:
Running MCP Server in Background
For SSE transport (start server first, then configure client):
For streamable HTTP transport:
Note
The MCP server requires proper Cycode CLI authentication to function. Make sure you have authenticated using cycode auth or configured your credentials before starting the MCP server.
cycode auth
Troubleshooting MCP
If you encounter issues with the MCP server, you can enable debug logging to get more detailed information about what's happening. There are two ways to enable debug logging:
-v
--verbose
CYCODE_CLI_VERBOSE
The debug logs will show detailed information about:
This information can be helpful when:
Scan Command
Running a Scan
The Cycode CLI application offers several types of scans so that you can choose the option that best fits your case. The following are the current options and commands available:
| Option | Description |
|---|---|
| `-t, --scan-type [secret | iac |
--show-secret BOOLEAN |
Show secrets in plain text. See Show/Hide Secrets section for more details. |
--soft-fail BOOLEAN |
Run scan without failing, always return a non-error status code. See Soft Fail section for more details. |
| `--severity-threshold [INFO | LOW |
--sca-scan |
Specify the SCA scan you wish to execute (package-vulnerabilities/license-compliance). The default is both. |
--monitor |
When specified, the scan results will be recorded in Cycode. |
--cycode-report |
Display a link to the scan report in the Cycode platform in the console output. |
--no-restore |
When specified, Cycode will not run the restore command. This will scan direct dependencies ONLY! |
--gradle-all-sub-projects |
Run gradle restore command for all sub projects. This should be run from |
--maven-settings-file |
For Maven only, allows using a custom settings.xml file when scanning for dependencies |
--help |
Show options for given command. |
-t, --scan-type [secret|iac|sca|sast]
secret
iac
sca
sast
secret
--show-secret BOOLEAN
--soft-fail BOOLEAN
--severity-threshold [INFO|LOW|MEDIUM|HIGH|CRITICAL]
--sca-scan
package-vulnerabilities
license-compliance
--monitor
--cycode-report
--no-restore
--gradle-all-sub-projects
--maven-settings-file
--help
| Command | Description |
|---|---|
| commit-history | Scan all the commits history in this git repository |
| path | Scan the files in the path supplied in the command |
| pre-commit | Use this command to scan the content that was not committed yet |
| repository | Scan git repository including its history |
Options
Severity Option
To limit the results of the scan to a specific severity threshold, the argument --severity-threshold can be added to the scan command.
--severity-threshold
For example, the following command will scan the repository for policy violations that have severity of Medium or higher:
cycode scan --severity-threshold MEDIUM repository ~/home/git/codebase
cycode scan --severity-threshold MEDIUM repository ~/home/git/codebase
Monitor Option
Note
This option is only available to SCA scans.
To push scan results tied to the SCA policies found in an SCA type scan to Cycode, add the argument --monitor to the scan command.
--monitor
For example, the following command will scan the repository for SCA policy violations and push them to Cycode platform:
cycode scan -t sca --monitor repository ~/home/git/codebase
cycode scan -t sca --monitor repository ~/home/git/codebase
Cycode Report Option
For every scan performed using the Cycode CLI, a report is automatically generated and its results are sent to Cycode. These results are tied to the relevant policies (e.g., SCA policies for Repository scans) within the Cycode platform.
To have the direct URL to this Cycode report printed in your CLI output after the scan completes, add the argument --cycode-report to your scan command.
--cycode-report
cycode scan --cycode-report repository ~/home/git/codebase
cycode scan --cycode-report repository ~/home/git/codebase
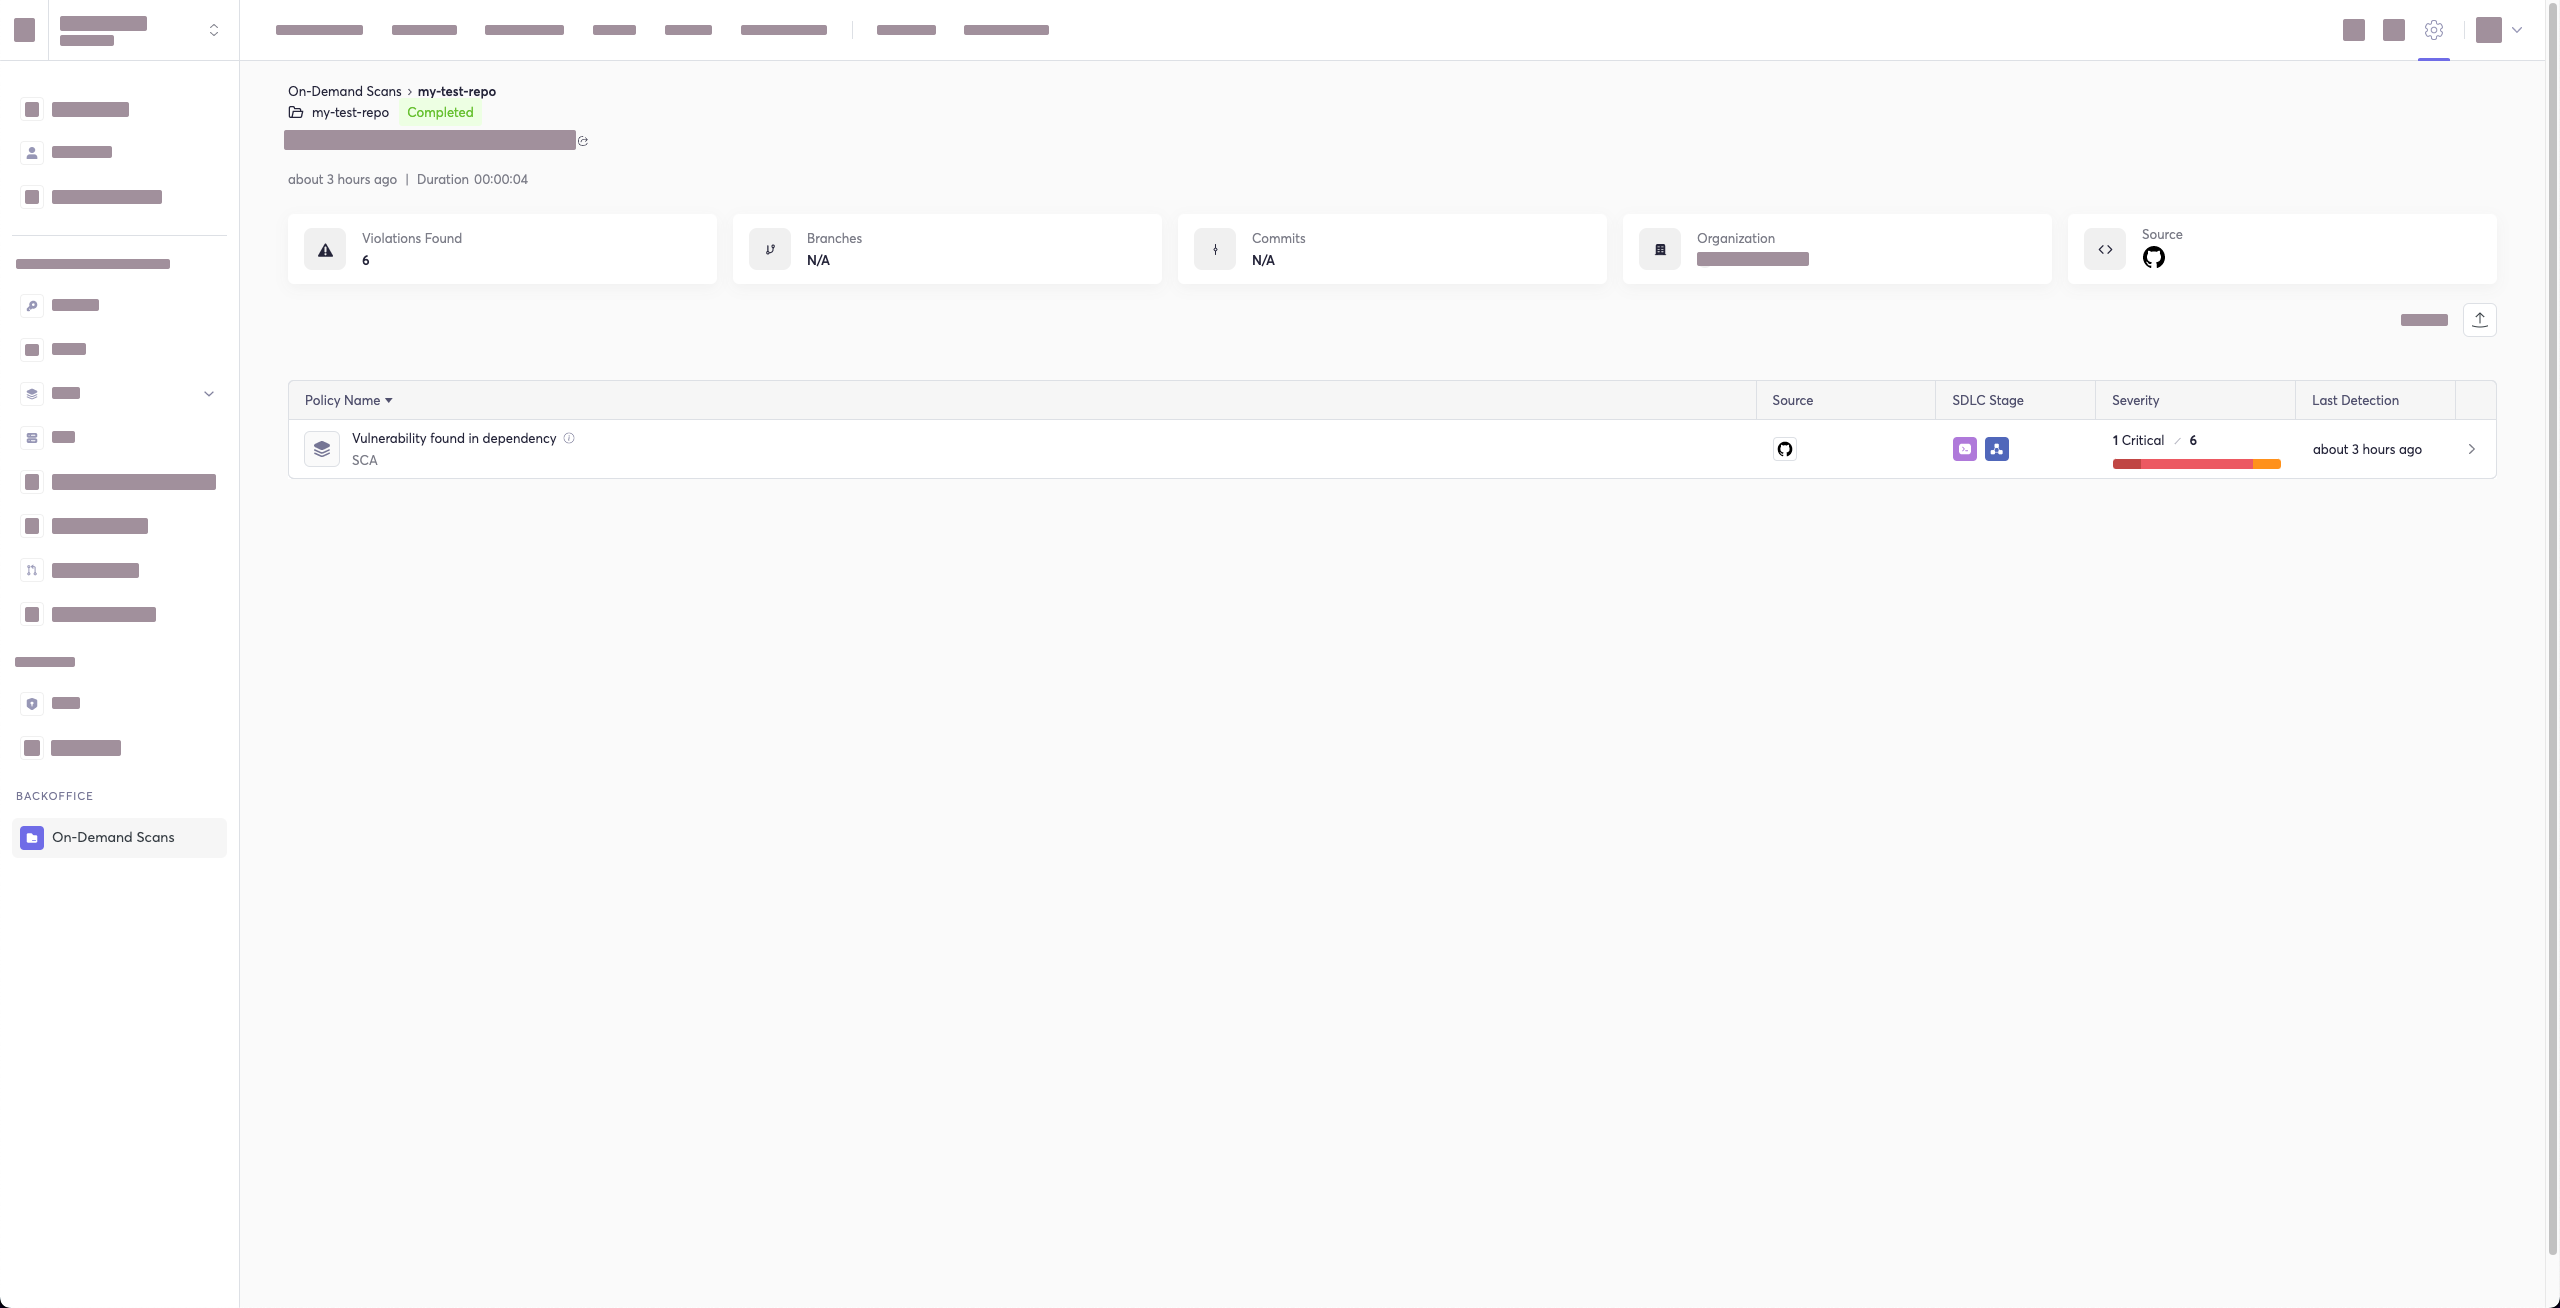
All scan results from the CLI will appear in the CLI Logs section of Cycode. If you included the --cycode-report flag in your command, a direct link to the specific report will be displayed in your terminal following the scan results.
--cycode-report
Warning
You must have the owner or admin role in Cycode to view this page.
owner
admin
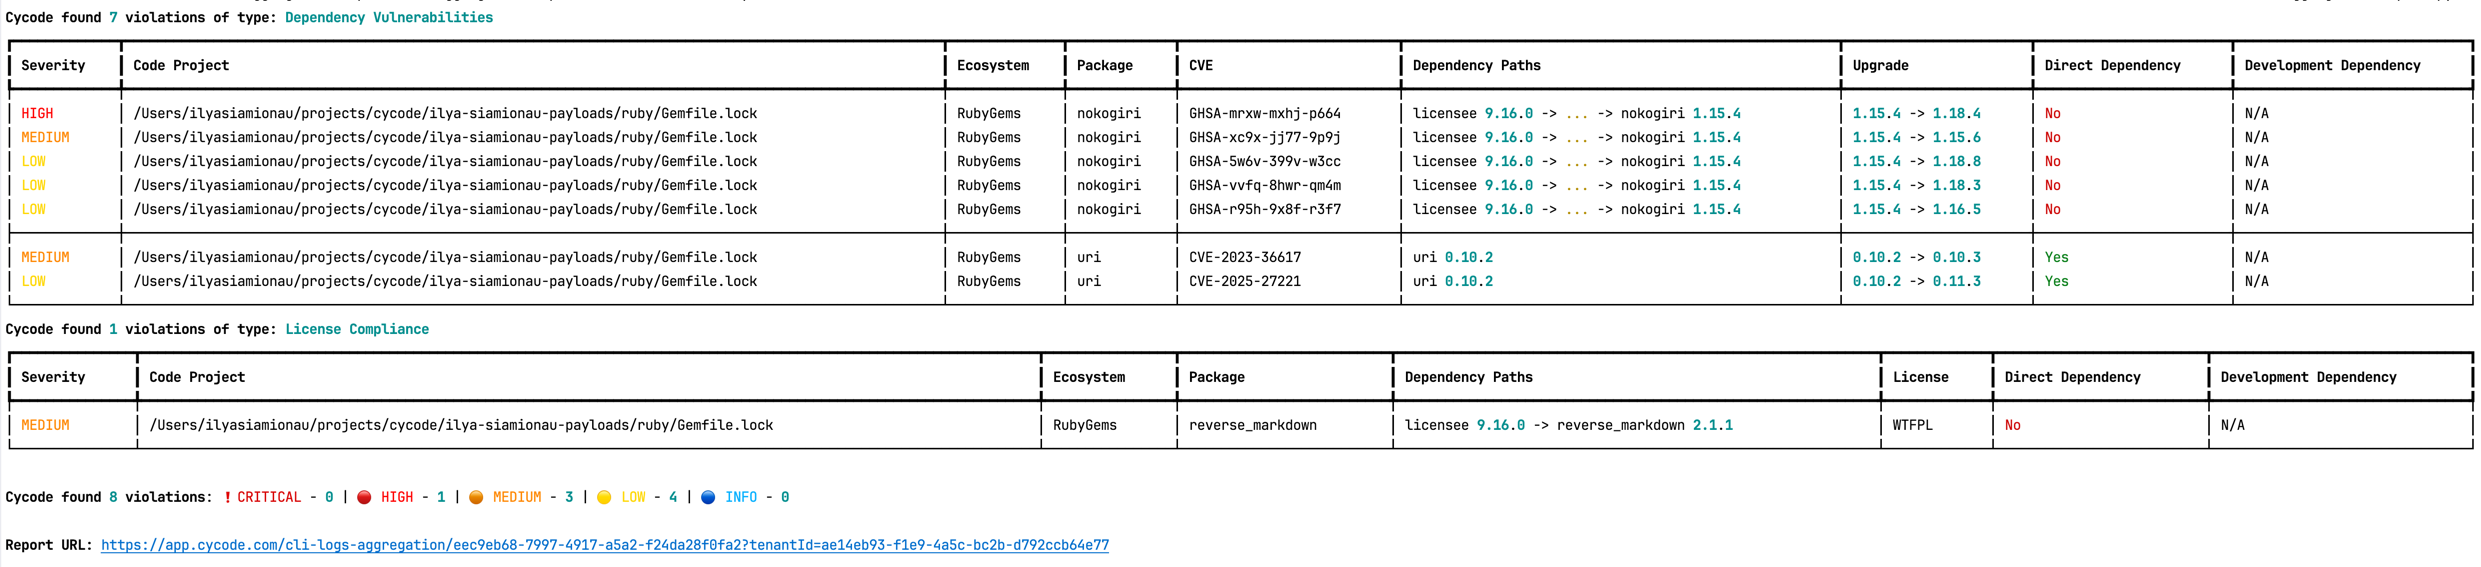
The report page will look something like below:
Package Vulnerabilities Option
Note
This option is only available to SCA scans.
To scan a specific package vulnerability of your local repository, add the argument --sca-scan package-vulnerabilities following the -t sca or --scan-type sca option.
--sca-scan package-vulnerabilities
-t sca
--scan-type sca
In the previous example, if you wanted to only run an SCA scan on package vulnerabilities, you could execute the following:
cycode scan -t sca --sca-scan package-vulnerabilities repository ~/home/git/codebase
cycode scan -t sca --sca-scan package-vulnerabilities repository ~/home/git/codebase
License Compliance Option
Note
This option is only available to SCA scans.
To scan a specific branch of your local repository, add the argument --sca-scan license-compliance followed by the name of the branch you wish to scan.
--sca-scan license-compliance
In the previous example, if you wanted to only scan a branch named dev, you could execute the following:
dev
cycode scan -t sca --sca-scan license-compliance repository ~/home/git/codebase -b dev
cycode scan -t sca --sca-scan license-compliance repository ~/home/git/codebase -b dev
Lock Restore Option
Note
This option is only available to SCA scans.
We use the sbt-dependency-lock plugin to restore the lock file for SBT projects.
To disable lock restore in use --no-restore option.
--no-restore
Prerequisites:
sbt-dependency-lock plugin: Install the plugin by adding the following line to project/plugins.sbt:
sbt-dependency-lock
project/plugins.sbt
addSbtPlugin("software.purpledragon" % "sbt-dependency-lock" % "1.5.1")
Repository Scan
A repository scan examines an entire local repository for any exposed secrets or insecure misconfigurations. This more holistic scan type looks at everything: the current state of your repository and its commit history. It will look not only for secrets that are currently exposed within the repository but previously deleted secrets as well.
To execute a full repository scan, execute the following:
cycode scan repository {{path}}
cycode scan repository {{path}}
For example, if you wanted to scan a repository stored in ~/home/git/codebase, you could execute the following:
~/home/git/codebase
cycode scan repository ~/home/git/codebase
cycode scan repository ~/home/git/codebase
The following option is available for use with this command:
| Option | Description |
|---|---|
-b, --branch TEXT |
Branch to scan, if not set scanning the default branch |
-b, --branch TEXT
Branch Option
To scan a specific branch of your local repository, add the argument -b (alternatively, --branch) followed by the name of the branch you wish to scan.
-b
--branch
Given the previous example, if you wanted to only scan a branch named dev, you could execute the following:
dev
cycode scan repository ~/home/git/codebase -b dev
cycode scan repository ~/home/git/codebase -b dev
Path Scan
A path scan examines a specific local directory and all the contents within it, instead of focusing solely on a GIT repository.
To execute a directory scan, execute the following:
cycode scan path {{path}}
cycode scan path {{path}}
For example, consider a scenario in which you want to scan the directory located at ~/home/git/codebase. You could then execute the following:
~/home/git/codebase
cycode scan path ~/home/git/codebase
cycode scan path ~/home/git/codebase
Terraform Plan Scan
Cycode CLI supports Terraform plan scanning (supporting Terraform 0.12 and later)
Terraform plan file must be in JSON format (having .json extension)
.json
If you just have a configuration file, you can generate a plan by doing the following:
Initialize a working directory that contains Terraform configuration file:
terraform init
terraform init
Create Terraform execution plan and save the binary output:
terraform plan -out={tfplan_output}
terraform plan -out={tfplan_output}
Convert the binary output file into readable JSON:
terraform show -json {tfplan_output} > {tfplan}.json
terraform show -json {tfplan_output} > {tfplan}.json
Scan your {tfplan}.json with Cycode CLI:
{tfplan}.json
cycode scan -t iac path ~/PATH/TO/YOUR/{tfplan}.json
cycode scan -t iac path ~/PATH/TO/YOUR/{tfplan}.json
Commit History Scan
Note
Secrets scanning analyzes all commits in the repository history because secrets introduced and later removed can still be leaked or exposed. SCA and SAST scanning focus only on the latest code state and the changes between branches or pull requests. Full commit history scanning is not performed for SCA and SAST.
A commit history scan is limited to a local repository’s previous commits, focused on finding any secrets within the commit history, instead of examining the repository’s current state.
To execute a commit history scan, execute the following:
cycode scan commit-history {{path}}
cycode scan commit-history {{path}}
For example, consider a scenario in which you want to scan the commit history for a repository stored in ~/home/git/codebase. You could then execute the following:
~/home/git/codebase
cycode scan commit-history ~/home/git/codebase
cycode scan commit-history ~/home/git/codebase
The following options are available for use with this command:
| Option | Description |
|---|---|
-r, --commit-range TEXT |
Scan a commit range in this git repository, by default cycode scans all commit history (example: HEAD~1) |
-r, --commit-range TEXT
Commit Range Option
The commit history scan, by default, examines the repository’s entire commit history, all the way back to the initial commit. You can instead limit the scan to a specific commit range by adding the argument --commit-range (-r) followed by the name you specify.
--commit-range
-r
Consider the previous example. If you wanted to scan only specific commits in your repository, you could execute the following:
cycode scan commit-history -r {{from-commit-id}}...{{to-commit-id}} ~/home/git/codebase
cycode scan commit-history -r {{from-commit-id}}...{{to-commit-id}} ~/home/git/codebase
Pre-Commit Scan
A pre-commit scan automatically identifies any issues before you commit changes to your repository. There is no need to manually execute this scan; configure the pre-commit hook as detailed under the Installation section of this guide.
After installing the pre-commit hook, you may occasionally wish to skip scanning during a specific commit. To do this, add the following to your git command to skip scanning for a single commit:
git
Scan Results
Each scan will complete with a message stating if any issues were found or not.
If no issues are found, the scan ends with the following success message:
Good job! No issues were found!!! 👏👏👏
Good job! No issues were found!!! 👏👏👏
If an issue is found, a violation card appears upon completion instead. In this case you should review the file in question for the specific line highlighted by the result message. Implement any changes required to resolve the issue, then execute the scan again.
Show/Hide Secrets
In the examples below, a secret was found in the file secret_test, located in the subfolder cli. The second part of the message shows the specific line the secret appears in, which in this case is a value assigned to googleApiKey.
secret_test
cli
googleApiKey
Note how the example obscures the actual secret value, replacing most of the secret with asterisks. Scans obscure secrets by default, but you may optionally disable this feature to view the full secret (assuming the machine you are viewing the scan result on is sufficiently secure from prying eyes).
To disable secret obfuscation, add the --show-secret argument to any type of scan.
--show-secret
In the following example, a Path Scan is executed against the cli subdirectory with the option enabled to display any secrets found in full:
cli
cycode scan --show-secret path ./cli
cycode scan --show-secret path ./cli
The result would then not be obfuscated.
Soft Fail
In normal operation the CLI will return an exit code of 1 when issues are found in the scan results. Depending on your CI/CD setup this will usually result in an overall failure. If you don't want this to happen, you can use the soft fail feature.
1
By adding the --soft-fail option to any type of scan, the exit code will be forced to 0 regardless of whether any results are found.
--soft-fail
0
Example Scan Results
Secrets Result Example
IaC Result Example
SCA Result Example
SAST Result Example
Company Custom Remediation Guidelines
If your company has set custom remediation guidelines in the relevant policy via the Cycode portal, you'll see a field for “Company Guidelines” that contains the remediation guidelines you added. Note that if you haven't added any company guidelines, this field will not appear in the CLI tool.
Ignoring Scan Results
Ignore rules can be added to ignore specific secret values, specific SHA512 values, specific paths, and specific Cycode secret and IaC rule IDs. This will cause the scan to not alert these values. The ignoring rules are written and saved locally in the ./.cycode/config.yaml file.
./.cycode/config.yaml
Warning
Adding values to be ignored should be done with careful consideration of the values, paths, and policies to ensure that the scans will pick up true positives.
The following are the options available for the cycode ignore command:
cycode ignore
| Option | Description |
|---|---|
--by-value TEXT |
Ignore a specific value while scanning for secrets. See Ignoring a Secret Value for more details. |
--by-sha TEXT |
Ignore a specific SHA512 representation of a string while scanning for secrets. See Ignoring a Secret SHA Value for more details. |
--by-path TEXT |
Avoid scanning a specific path. Need to specify scan type. See Ignoring a Path for more details. |
--by-rule TEXT |
Ignore scanning a specific secret rule ID/IaC rule ID/SCA rule ID. See Ignoring a Secret or Iac Rule for more details. |
--by-package TEXT |
Ignore scanning a specific package version while running an SCA scan. Expected pattern - name@version. See Ignoring a Package for more details. |
--by-cve TEXT |
Ignore scanning a specific CVE while running an SCA scan. Expected pattern: CVE-YYYY-NNN. |
| `-t, --scan-type [secret | iac |
-g, --global |
Add an ignore rule and update it in the global .cycode config file. |
--by-value TEXT
--by-sha TEXT
--by-path TEXT
--by-rule TEXT
--by-package TEXT
name@version
--by-cve TEXT
-t, --scan-type [secret|iac|sca|sast]
secret
iac
sca
sast
secret
-g, --global
.cycode
Ignoring a Secret Value
To ignore a specific secret value, you will need to use the --by-value flag. This will ignore the given secret value from all future scans. Use the following command to add a secret value to be ignored:
--by-value
cycode ignore --by-value {{secret-value}}
cycode ignore --by-value {{secret-value}}
In the example at the top of this section, the command to ignore a specific secret value is as follows:
cycode ignore --by-value h3110w0r1d!@#$350
cycode ignore --by-value h3110w0r1d!@#$350
In the example above, replace the h3110w0r1d!@#$350 value with your non-masked secret value. See the Cycode scan options for details on how to see secret values in the scan results.
h3110w0r1d!@#$350
Ignoring a Secret SHA Value
To ignore a specific secret SHA value, you will need to use the --by-sha flag. This will ignore the given secret SHA value from all future scans. Use the following command to add a secret SHA value to be ignored:
--by-sha
cycode ignore --by-sha {{secret-sha-value}}
cycode ignore --by-sha {{secret-sha-value}}
In the example at the top of this section, the command to ignore a specific secret SHA value is as follows:
cycode ignore --by-sha a44081db3296c84b82d12a35c446a3cba19411dddfa0380134c75f7b3973bff0
cycode ignore --by-sha a44081db3296c84b82d12a35c446a3cba19411dddfa0380134c75f7b3973bff0
In the example above, replace the a44081db3296c84b82d12a35c446a3cba19411dddfa0380134c75f7b3973bff0 value with your secret SHA value.
a44081db3296c84b82d12a35c446a3cba19411dddfa0380134c75f7b3973bff0
Ignoring a Path
To ignore a specific path for either secret, IaC, or SCA scans, you will need to use the --by-path flag in conjunction with the -t, --scan-type flag (you must specify the scan type). This will ignore the given path from all future scans for the given scan type. Use the following command to add a path to be ignored:
--by-path
-t, --scan-type
cycode ignore -t {{scan-type}} --by-path {{path}}
cycode ignore -t {{scan-type}} --by-path {{path}}
In the example at the top of this section, the command to ignore a specific path for a secret is as follows:
cycode ignore -t secret --by-path ~/home/my-repo/config
cycode ignore -t secret --by-path ~/home/my-repo/config
In the example above, replace the ~/home/my-repo/config value with your path value.
~/home/my-repo/config
In the example at the top of this section, the command to ignore a specific path from IaC scans is as follows:
cycode ignore -t iac --by-path ~/home/my-repo/config
cycode ignore -t iac --by-path ~/home/my-repo/config
In the example above, replace the ~/home/my-repo/config value with your path value.
~/home/my-repo/config
In the example at the top of this section, the command to ignore a specific path from SCA scans is as follows:
cycode ignore -t sca --by-path ~/home/my-repo/config
cycode ignore -t sca --by-path ~/home/my-repo/config
In the example above, replace the ~/home/my-repo/config value with your path value.
~/home/my-repo/config
Ignoring a Secret, IaC, SCA, or SAST Rule
To ignore a specific secret, IaC, SCA, or SAST rule, you will need to use the --by-rule flag in conjunction with the -t, --scan-type flag (you must specify the scan type). This will ignore the given rule ID value from all future scans. Use the following command to add a rule ID value to be ignored:
--by-rule
-t, --scan-type
cycode ignore -t {{scan-type}} --by-rule {{rule-ID}}
cycode ignore -t {{scan-type}} --by-rule {{rule-ID}}
In the example at the top of this section, the command to ignore the specific secret rule ID is as follows:
cycode ignore -t secret --by-rule ce3a4de0-9dfc-448b-a004-c538cf8b4710
cycode ignore -t secret --by-rule ce3a4de0-9dfc-448b-a004-c538cf8b4710
In the example above, replace the ce3a4de0-9dfc-448b-a004-c538cf8b4710 value with the rule ID you want to ignore.
ce3a4de0-9dfc-448b-a004-c538cf8b4710
In the example at the top of this section, the command to ignore the specific IaC rule ID is as follows:
cycode ignore -t iac --by-rule bdaa88e2-5e7c-46ff-ac2a-29721418c59c
cycode ignore -t iac --by-rule bdaa88e2-5e7c-46ff-ac2a-29721418c59c
In the example above, replace the bdaa88e2-5e7c-46ff-ac2a-29721418c59c value with the rule ID you want to ignore.
bdaa88e2-5e7c-46ff-ac2a-29721418c59c
In the example at the top of this section, the command to ignore the specific SCA rule ID is as follows:
cycode ignore -t sca --by-rule dc21bc6b-9f4f-46fb-9f92-e4327ea03f6b
cycode ignore -t sca --by-rule dc21bc6b-9f4f-46fb-9f92-e4327ea03f6b
In the example above, replace the dc21bc6b-9f4f-46fb-9f92-e4327ea03f6b value with the rule ID you want to ignore.
dc21bc6b-9f4f-46fb-9f92-e4327ea03f6b
Ignoring a Package
Note
This option is only available to the SCA scans.
To ignore a specific package in the SCA scans, you will need to use the --by-package flag in conjunction with the -t, --scan-type flag (you must specify the sca scan type). This will ignore the given package, using the {{package_name}}@{{package_version}} formatting, from all future scans. Use the following command to add a package and version to be ignored:
--by-package
-t, --scan-type
sca
{{package_name}}@{{package_version}}
cycode ignore --scan-type sca --by-package {{package_name}}@{{package_version}}
cycode ignore --scan-type sca --by-package {{package_name}}@{{package_version}}
OR
cycode ignore -t sca --by-package {{package_name}}@{{package_version}}
cycode ignore -t sca --by-package {{package_name}}@{{package_version}}
In the example below, the command to ignore a specific SCA package is as follows:
cycode ignore --scan-type sca --by-package [email protected]
cycode ignore --scan-type sca --by-package [email protected]
In the example above, replace pyyaml with package name and 5.3.1 with the package version you want to ignore.
pyyaml
5.3.1
Ignoring via a config file
The applied ignoring rules are stored in the configuration file called config.yaml.
This file could be easily shared between developers or even committed to remote Git.
These files are always located in the .cycode folder.
The folder starts with a dot (.), and you should enable the displaying of hidden files to see it.
config.yaml
.cycode
Path of the config files
By default, all cycode ignore commands save the ignoring rule to the current directory from which CLI has been run.
cycode ignore
Example: running ignoring CLI command from /Users/name/projects/backend will create config.yaml in /Users/name/projects/backend/.cycode
/Users/name/projects/backend
config.yaml
/Users/name/projects/backend/.cycode
The second option is to save ignoring rules to the global configuration files.
The path of the global config is ~/.cycode/config.yaml,
where ~ means users home directory, for example, /Users/name` on macOS.
~/.cycode/config.yaml
~
/Users/name
Saving to the global space could be performed with the -g flag of the cycode ignore command.
For example: cycode ignore -g --by-value test-value.
-g
cycode ignore
cycode ignore -g --by-value test-value
Proper working directory
It is incredibly important to place the .cycode folder and run CLI from the same place.
You should double-check it when working with different environments like CI/CD (GitHub Actions, Jenkins, etc.).
.cycode
You can commit the .cycode folder to the root of your repository. In this scenario, you must run CLI scans from the repository root. If that doesn't fit your requirements, you could temporarily copy the .cycode folder to wherever you want and perform a CLI scan from this folder.
.cycode
.cycode
Structure ignoring rules in the config
It's important to understand how CLI stores ignored rules to be able to read these configuration files or even modify them without CLI.
The abstract YAML structure:
Possible values of scanTypeName: iac, sca, sast, secret.
scanTypeName
iac
sca
sast
secret
Possible values of ignoringType: paths, values, rules, packages, shas, cves.
ignoringType
paths
values
rules
packages
shas
cves
Warning
Values for "ignore by value" are not stored as plain text! CLI stores sha256 hashes of the values instead. You should put hashes of the string when modifying the configuration file by hand.
Example of real config.yaml:
config.yaml
Report Command
Generating SBOM Report
A software bill of materials (SBOM) is an inventory of all constituent components and software dependencies involved in the development and delivery of an application. Using this command, you can create an SBOM report for your local project or for your repository URI.
The following options are available for use with this command:
| Option | Description | Required | Default |
|---|---|---|---|
| `-f, --format [spdx-2.2 | spdx-2.3 | cyclonedx-1.4]` | SBOM format |
-o, --output-format [JSON] |
Specify the output file format | No | json |
--output-file PATH |
Output file | No | autogenerated filename saved to the current directory |
--include-vulnerabilities |
Include vulnerabilities | No | False |
--include-dev-dependencies |
Include dev dependencies | No | False |
-f, --format [spdx-2.2|spdx-2.3|cyclonedx-1.4]
-o, --output-format [JSON]
--output-file PATH
--include-vulnerabilities
--include-dev-dependencies
The following commands are available for use with this command:
| Command | Description |
|---|---|
path |
Generate SBOM report for provided path in the command |
repository-url |
Generate SBOM report for provided repository URI in the command |
path
repository-url
Repository
To create an SBOM report for a repository URI:
cycode report sbom --format <sbom format> --include-vulnerabilities --include-dev-dependencies --output-file </path/to/file> repository_url <repository url>
cycode report sbom --format <sbom format> --include-vulnerabilities --include-dev-dependencies --output-file </path/to/file> repository_url <repository url>
For example:
cycode report sbom --format spdx-2.3 --include-vulnerabilities --include-dev-dependencies repository_url https://github.com/cycodehq/cycode-cli.git
cycode report sbom --format spdx-2.3 --include-vulnerabilities --include-dev-dependencies repository_url https://github.com/cycodehq/cycode-cli.git
Local Project
To create an SBOM report for a path:
cycode report sbom --format <sbom format> --include-vulnerabilities --include-dev-dependencies --output-file </path/to/file> path </path/to/project>
cycode report sbom --format <sbom format> --include-vulnerabilities --include-dev-dependencies --output-file </path/to/file> path </path/to/project>
For example:
cycode report sbom --format spdx-2.3 --include-vulnerabilities --include-dev-dependencies path /path/to/local/project
cycode report sbom --format spdx-2.3 --include-vulnerabilities --include-dev-dependencies path /path/to/local/project
Scan Logs
All CLI scans are logged in Cycode. The logs can be found under Settings > CLI Logs.
Syntax Help
You may add the --help argument to any command at any time to see a help message that will display available options and their syntax.
--help
To see general help, simply enter the command:
cycode --help
cycode --help
To see scan options, enter:
cycode scan --help
cycode scan --help
To see the options available for a specific type of scan, enter:
cycode scan {{option}} --help
cycode scan {{option}} --help
For example, to see options available for a Path Scan, you would enter:
cycode scan path --help
cycode scan path --help
To see the options available for the ignore scan function, use this command:
cycode ignore --help
cycode ignore --help
To see the options available for a report, use this command:
cycode report --help
cycode report --help
To see the options available for a specific type of report, enter:
cycode scan {{option}} --help
cycode scan {{option}} --help
About
Boost security in your dev lifecycle via SAST, SCA, Secrets & IaC scanning
Topics
Resources
License
Security policy
Uh oh!
There was an error while loading. Please reload this page.
There was an error while loading. Please reload this page.
Stars
Watchers
Forks
Releases 55
Uh oh!
There was an error while loading. Please reload this page.
There was an error while loading. Please reload this page.
Contributors 21
Uh oh!
There was an error while loading. Please reload this page.
There was an error while loading. Please reload this page.
Languages
Footer
Footer navigation
Recommend MCP Servers 💡

@reapi/mcp-openapi
OpenAPI specification MCP server.

MCP Geo
Geocoding MCP server with GeoPY!

salaah-mcp
MCP service providing Islamic prayer times calculations and related Islamic astronomical information

a11y-mcp-server
An MCP server that gives LLMs access to web accessibility testing APIs using Deque Axe-core and Puppeteer

typescript-analyzer
An intelligent MCP server for analyzing and fixing TypeScript 'any' types, offering fast, extensible, and React-aware capabilities.

mcp-example
A demonstration MCP server with SSE communication and a demo greeting tool.